
Showing posts with label IBM. Show all posts
Showing posts with label IBM. Show all posts
Thursday, April 30, 2015
How to find relocated N series downloads from IBM Portals

Wednesday, September 10, 2014
Accessing RAID Configuration in IBM x3650M2 or IBM x3550M2
I was trying to locate the RAID configuration in IBM x3650M2 or IBM x3550M2, In the older configuration, there is a LSI configuration utility where when you press Ctrl-C and you get to the WebBIOS
To locate the LSI configuration,
To locate the LSI configuration,
- Boot to the BIOS Setup
- System Settings
- Adapter and UEFI Drivers
- List All Drivers and Adapter
- LSI (Hit Enter and you will enter the WebBIOS)
Thursday, August 28, 2014
Trying to allocate 1005 pages for VMLINUZ error when booting with RHEL or CentOS 6.5 disks

I was booting the RHEL 6.5 or CentOS 6.5 on a IBM PureFlex System and I have this error. This occurs when When installing Red Hat Enterprise Linux 6 from DVD media the installation will default to native Extensible Firmware Interface (EFI) mode boot. I do not have
According to IBM Website,
The workaround is simply to install the operating system in the traditional legacy mode, since there is generally no reason to install in other than Legacy mode. The workaround is only necessary if the media you are booting defaults to EFI mode (DVD or EFI Preboot eXecution Environment (PXE)) otherwise a legacy installation (e.g. - traditional PXE) is the default and is unaffected by this issue.
To force a legacy installation of the operating system from the EFI bootable DVD media the user should:
Press F12 key when the IBM splash screen is shown during system boot.
Select Legacy Only option and press Enter.
The operating system will boot and install in traditional legacy boot mode.
To force a legacy installation of the operating system from the EFI bootable DVD media the user should:
Press F12 key when the IBM splash screen is shown during system boot.
Select Legacy Only option and press Enter.
The operating system will boot and install in traditional legacy boot mode.
And the issue was resolved.
References:
Sunday, April 13, 2014
Using Intelligent Platform Management Interface (IPMI) on IBM Linux Platforms
This is the Blueprint document of using Intelligent Platform Management Interface (IPMI) on IBM Linux Platforms for x86 machine Using Intelligent Platform Management Interface (IPMI) on IBM Linux Platforms
Wednesday, March 26, 2014
Kipmi0 May Show Increased CPU Utilization on Linux
This article is takenf from IBM Support Portal. Kipmi0 May Show Increased CPU Utilization on Linux
Description
The kipmi0 process may show increased CPU utilization in Linux. The utilization may increase up to 100% when the IPMI (Intelligent Platform Management Interface) device, such as a BMC (Baseboard Management Controller) or IMM (Integrated Management Controller) is busy or non-responsive.
Fix
No fix required. You should ignore increased CPU utilization as it has no impact on actual system performance.
Work-around
1. If using an IPMI device, reset the BMC or reboot the system.
2. If not using an IPMI device, stop the IMPI service by issuing the following command:
service ipmi stop
Details
IBM has requested that the design of kipmi be reviewed in future releases. Any changes that may occur through this review would be implemented in future Linux Distribution updates.
The increased CPU usage of kipmi is normal. The hardware interface is not interrupt driven, so the driver must poll the device for status and messages. It is this polling that is showing up as a busy CPU. The kipmi kernel thread has its priority intentionally lowered so that it does not interfere with other processes on the system. Even when it is polling in its tightest loop (usually when it thinks the BMC has active events it needs to handle), it will give up the CPU to any process that wants it.
The CPU usage seen for the kipmi0 kernel thread is what is known as IDLE time. Kipmi0 is running when there are no other jobs to run and is one of the lowest priority processes on the system.
This is the standard behavior for this interface and is not unique to this process running in an IBM environment or specifically with IBM Systems Director.
Description
The kipmi0 process may show increased CPU utilization in Linux. The utilization may increase up to 100% when the IPMI (Intelligent Platform Management Interface) device, such as a BMC (Baseboard Management Controller) or IMM (Integrated Management Controller) is busy or non-responsive.
Fix
No fix required. You should ignore increased CPU utilization as it has no impact on actual system performance.
Work-around
1. If using an IPMI device, reset the BMC or reboot the system.
2. If not using an IPMI device, stop the IMPI service by issuing the following command:
service ipmi stop
Details
IBM has requested that the design of kipmi be reviewed in future releases. Any changes that may occur through this review would be implemented in future Linux Distribution updates.
The increased CPU usage of kipmi is normal. The hardware interface is not interrupt driven, so the driver must poll the device for status and messages. It is this polling that is showing up as a busy CPU. The kipmi kernel thread has its priority intentionally lowered so that it does not interfere with other processes on the system. Even when it is polling in its tightest loop (usually when it thinks the BMC has active events it needs to handle), it will give up the CPU to any process that wants it.
The CPU usage seen for the kipmi0 kernel thread is what is known as IDLE time. Kipmi0 is running when there are no other jobs to run and is one of the lowest priority processes on the system.
This is the standard behavior for this interface and is not unique to this process running in an IBM environment or specifically with IBM Systems Director.
Sunday, January 26, 2014
Lenovo Plans to Acquire IBM’s x86 Server Business
Taken from the announcement from IBM "IBM to extend partnership with Lenovo"
Lenovo and IBM have entered into a definitive agreement in which Lenovo plans to acquire IBM’s x86 server business. This includes System x, BladeCenter and Flex System blade servers and switches, x86-based Flex integrated systems, NeXtScale and iDataPlex servers and associated software, blade networking and maintenance operations.
IBM will retain its System z mainframes, Power Systems, Storage Systems, Power-based Flex servers, and PureApplication and PureData appliances.
The agreement builds upon a longstanding collaboration that began in 2005 when Lenovo acquired IBM’s PC business, which included the ThinkPad line of PCs. In the period since the companies have continued to collaborate in many areas.
IBM will continue to develop and evolve its Windows and Linux software portfolio for the x86 platform. IBM is a leading developer of software products for x86 servers with thousands of products and tens of thousands of software developer and services professionals who build software for x86 systems.
For more detailed information, see
xxxxxx
Lenovo and IBM have entered into a definitive agreement in which Lenovo plans to acquire IBM’s x86 server business. This includes System x, BladeCenter and Flex System blade servers and switches, x86-based Flex integrated systems, NeXtScale and iDataPlex servers and associated software, blade networking and maintenance operations.
IBM will retain its System z mainframes, Power Systems, Storage Systems, Power-based Flex servers, and PureApplication and PureData appliances.
The agreement builds upon a longstanding collaboration that began in 2005 when Lenovo acquired IBM’s PC business, which included the ThinkPad line of PCs. In the period since the companies have continued to collaborate in many areas.
IBM will continue to develop and evolve its Windows and Linux software portfolio for the x86 platform. IBM is a leading developer of software products for x86 servers with thousands of products and tens of thousands of software developer and services professionals who build software for x86 systems.
For more detailed information, see
xxxxxx
Saturday, June 15, 2013
Enabling SRIOV in BIOS for IBM Servers and Blade Servers
Step 1: Power on the system, and press F1 to enter the Setup utility.
Step 2: Select System Settings and then Network.
Step 3: Under the Network Device List, select the device to be configured and press Enter to see all the Network Device options (Figure 1).
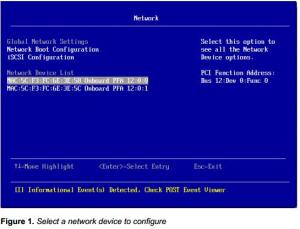
Step 4: Select the device’s description and press Enter to configure the device (Figure 2)
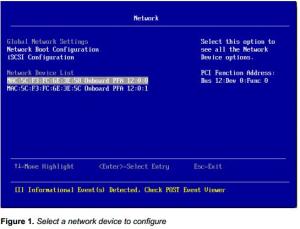
Step 5: From the selection menu, select Advanced Mode and press Enter to change the value (Figure 3).
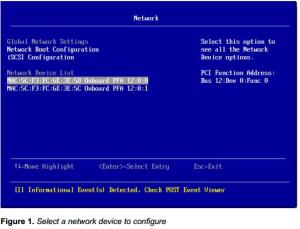
Step 6: Choose Enable and press Enter.
Step 7: On the same selection menu, select Controller Configuration and press Enter to enter the configuration menu.
Step 8: Select Configure SRIOV and hit Enter.
Step 9: On the Configure SRIOV page, press Enter to toggle the values
Step 10: Select Enable and press Enter
Step 11: Select Save Current Configurations and press Enter.
Step 12: Press Esc to exit the menu. Then, click Save to save the configuration.
Step 13: Reboot the system.
Step 2: Select System Settings and then Network.
Step 3: Under the Network Device List, select the device to be configured and press Enter to see all the Network Device options (Figure 1).

Step 4: Select the device’s description and press Enter to configure the device (Figure 2)

Step 5: From the selection menu, select Advanced Mode and press Enter to change the value (Figure 3).

Step 6: Choose Enable and press Enter.
Step 7: On the same selection menu, select Controller Configuration and press Enter to enter the configuration menu.
Step 8: Select Configure SRIOV and hit Enter.
Step 9: On the Configure SRIOV page, press Enter to toggle the values
Step 10: Select Enable and press Enter
Step 11: Select Save Current Configurations and press Enter.
Step 12: Press Esc to exit the menu. Then, click Save to save the configuration.
Step 13: Reboot the system.
Wednesday, December 12, 2012
Good Redbook read - IBM Platform Computing Solutions
A good Redbook read on IBM Platform Computing Solutions. The abstract which is taken from the site,
This IBM® Platform Computing Solutions Redbooks® publication is the first book to describe each of the available offerings that are part of the IBM portfolio of Cloud, analytics, and High Performance Computing (HPC) solutions for our clients. This IBM Redbooks publication delivers descriptions of the available offerings from IBM Platform Computing that address challenges for our clients in each industry. We include a few implementation and testing scenarios with selected solutions............
The chapters are as followed:
Chapter 1. Introduction to IBM Platform Computing
Chapter 2. Technical computing software portfolio
Chapter 3. Planning
Chapter 4. IBM Platform Load Sharing Facility (LSF) product family
Chapter 5. IBM Platform Symphony
Chapter 6. IBM Platform High Performance Computing
Chapter 7. IBM Platform Cluster Manager Advanced Edition
Appendix A. IBM Platform Computing Message Passing Interface
Appendix B. Troubleshooting examples
Appendix C. IBM Platform Load Sharing Facility add-ons and examples
Appendix D. Getting started with KVM provisioning
Tuesday, November 20, 2012
IBM Mobile Solution

- IBM Interactive has already been named a leader in building engaging mobile apps. The IBM Mobile press release, in conjunction with the communications and assets below, continues to build out our mobile story and reinforce IBM as a leader in the mobile space:
- Forbes article (IBM Takes Mobile To The Road With Tools & Strategy) illustrates how the IBM mobile portfolio offers a complete solution set. Positive press and analyst reactions serve to further validate the strength of our offerings.
- The Wall Street Journal published an IBM Op-Ad entitled, "The Mobile World is Open for Business." The piece established IBM's mobile leadership and highlighted examples of companies using our products and services.
Saturday, October 13, 2012
IBM Interconnect 2012 Live Stream
An IBM InterConnect 2012 event in Singapore
View replay in Livestream
View replay in Livestream
- A source of global innovation, the art of the possible in growth markets
John Dunderdale, vice president of Software, IBM Growth Markets - Turning opportunities into outcomes
Steve Mills, senior vice president and Group Executive, IBM Software & Systems - Unleashing innovation: The new economics of IT
Rod Adkins, senior vice president, IBM Systems & Technology Group - Managing the velocity of Change
Robert LeBlanc, senior vice president, IBM Middleware Software - Reinventing relationships and uncovering new markets
Mike Rhodin, senior vice president, IBM Software Solutions Group
Jim Bramante, senior vice president, IBM Growth Markets
Wednesday, March 28, 2012
INIT failed status and Problem communicating with BSMP on IBM Blade Chassis
I have a fully loaded Blade Chassis H (ie 14 Blades). I have the following symptoms similar to what was written in IBM Site INIT failed status - IBM BladeCenter HS22, HS22V
The chassis has 14 blades installed.
Solution:
Install AMM firmware v3.54L (BPET54L) or later.
The file is available by selecting the appropriate machine type on the 'Software and device drivers - IBM BladeCenter' web page, at the following URL:
IBM Blade Chassis Product View
(IBM BladeCenter Advanced Management Module Firmware Update)
The patching will require restart of the AMM. Restarting the Advanced Management Module will disconnect your current session.
0X0021600 / Symptom:
BladeCenter HS22 or HS22V status is reported as Init Failed and the following error is posted in the Advanced Management Module (AMM) event log:0x00216000 Problem communicating with BSMP
The chassis has 14 blades installed.
Workaround:
Remove one blade from the chassis.Solution:
Install AMM firmware v3.54L (BPET54L) or later.
The file is available by selecting the appropriate machine type on the 'Software and device drivers - IBM BladeCenter' web page, at the following URL:
IBM Blade Chassis Product View
Patching
Select the correct Blade Chassis Product. Since I am using Blade Chassis H, my fixes were(IBM BladeCenter Advanced Management Module Firmware Update)
The patching will require restart of the AMM. Restarting the Advanced Management Module will disconnect your current session.
Saturday, February 25, 2012
PCI Device Resource Allocation Failure noticed during Boot Time for IBM Server 3650
After plugging on a HBA, Quad-Port Ethernet Card, Low latency TOE Card in additon to my RAID Controller. On boot, I saw this error "PCI Device Resource Allocation Failure" during boot time. But I did not pay much attention.
Until the system boot, I realize that my Low Latency TOE Card work but with no communication. I thought it was a card / cable issue and I correspondingly change it. But the effect was still the same. No communication still. Very puzzling.
In the IBM Website, there is an article that might give a hint. 1801 PCI resource error using CTRL-H with 2x MegaRAID 8480 - IBM System x.
From what I infer from the article, it is due to insufficient ROM Space for that many devices. And there is need to turn off unneeded ROM BIOS apps/PXE boot options.
What I did was to.....
Disable Planar Ethernet PXE/DHCP
If the above does not eliminate the error, do the following
Disable unrequired PCI ROM Slot
Reboot, you should see the error gone.
For more information see
Until the system boot, I realize that my Low Latency TOE Card work but with no communication. I thought it was a card / cable issue and I correspondingly change it. But the effect was still the same. No communication still. Very puzzling.
In the IBM Website, there is an article that might give a hint. 1801 PCI resource error using CTRL-H with 2x MegaRAID 8480 - IBM System x.
From what I infer from the article, it is due to insufficient ROM Space for that many devices. And there is need to turn off unneeded ROM BIOS apps/PXE boot options.
What I did was to.....
Disable Planar Ethernet PXE/DHCP
- Press F1 when prompted on boot
- Go to Setup Option
- At the Option of "Planer Ethernet PXE/DHCP", turn it to Disabled
If the above does not eliminate the error, do the following
Disable unrequired PCI ROM Slot
- Press F1 when prompted on boot
- Go to Advanced Setup
- Select PCI Settings
- Select PCI ROM Control Execution
Reboot, you should see the error gone.
For more information see
Sunday, February 19, 2012
How to replace failed disk on N-Series Filer
I had 2 failed disk on 1 aggregate for my N-Series (N3600) or NetApp FAS2050. I was really thankful that NetApp is RAID-6 with Dual Parity. Here are the steps that I took to quickly replace my failed disks.
Of course, I new that that the disks has failed as I see amber lights on my failed disks. I verify with the Syslog Messages in my Filer and this confirmed the 2 disks have failed.
NetApp Filer has hot-swappable disks, so it is safe to pull out the failed disks. Do verify that the disks has failed though. One you have replaced the disks, it should automatically detect the correct controller. If it does not, you have to do the following
U should see that the disk are unowned. I'm assuming you are using the controller console you are assigning the disk to. Just type
At your syslog file, you should see the disk being rebuilt. If somehow it the N-Series Filer do not accept the command above, you have to unown the disk again and enter the right controller console and assign the disk again. To unown, use the following command
Of course, I new that that the disks has failed as I see amber lights on my failed disks. I verify with the Syslog Messages in my Filer and this confirmed the 2 disks have failed.
NetApp Filer has hot-swappable disks, so it is safe to pull out the failed disks. Do verify that the disks has failed though. One you have replaced the disks, it should automatically detect the correct controller. If it does not, you have to do the following
Controller-A> disk show -n
 DISK       OWNER               POOL
------     -------             ------
0a.76    Not Owned              NONE
U should see that the disk are unowned. I'm assuming you are using the controller console you are assigning the disk to. Just type
Controller-A> disk assign 0a.76
At your syslog file, you should see the disk being rebuilt. If somehow it the N-Series Filer do not accept the command above, you have to unown the disk again and enter the right controller console and assign the disk again. To unown, use the following command
Controller-A> disk assign 0a.76 -s unowned -f
Friday, December 16, 2011
Blade hangs on boot and "FW/BIOS, firmware progress (ABR Status) FW/BIOS ROM corruption
2 of my Blade got hang on boot and suffered this "FW/BIOS, firmware progress (ABR Status) FW/BIOS ROM corruption". For more information on the resolution, do look at Blade hangs on boot and "FW/BIOS, firmware progress (ABR Status) FW/BIOS ROM corruption" message in AMM - IBM BladeCenter HS22, HS22V
From the site,
Symptom
When booting BladeCenter HS22 or HS22V with Integrated Management Module (IMM) build yuoo84c installed, the blade may hang at the "UEFI Platform Initializing" screen. The hang will be accompanied by the following event in the chassis Advanced Management Module (AMM) log:
FW/BIOS, firmware progress (ABR Status) FW/BIOS ROM corruption
Solution
This behavior is corrected in IMM firmware release yuoo91e and newer.
The file is or will be available by selecting the appropriate machine type on the 'Product View' of IBM Support's Fix Central web page, at the following URL:
http://www.ibm.com/support/fixcentral/systemx/groupView?query.productGroup=ibm%2FBladeCenter
Workaround
This failure may be reduced by disabling Internet Protocol Version 6 (IPv6) support for the IMM. This can be done via the following steps:
1. Boot the blade to the F1 Unified Extensible Firmware Interface (UEFI) setup screen.
2. Select "System Settings" and press Enter
3. Select "Integrated Management Module" and press Enter
4. Select "Network Configuration" and press Enter
5. Change "IP6" setting to "Disable"
Occasionally, the failure can be recovered by restarting the IMM. If this is not successful, then it is necessary to reseat the blade in the chassis to recover. After a reseat, the blade will boot normally.
From the site,
Symptom
When booting BladeCenter HS22 or HS22V with Integrated Management Module (IMM) build yuoo84c installed, the blade may hang at the "UEFI Platform Initializing" screen. The hang will be accompanied by the following event in the chassis Advanced Management Module (AMM) log:
FW/BIOS, firmware progress (ABR Status) FW/BIOS ROM corruption
Solution
This behavior is corrected in IMM firmware release yuoo91e and newer.
The file is or will be available by selecting the appropriate machine type on the 'Product View' of IBM Support's Fix Central web page, at the following URL:
http://www.ibm.com/support/fixcentral/systemx/groupView?query.productGroup=ibm%2FBladeCenter
Workaround
This failure may be reduced by disabling Internet Protocol Version 6 (IPv6) support for the IMM. This can be done via the following steps:
1. Boot the blade to the F1 Unified Extensible Firmware Interface (UEFI) setup screen.
2. Select "System Settings" and press Enter
3. Select "Integrated Management Module" and press Enter
4. Select "Network Configuration" and press Enter
5. Change "IP6" setting to "Disable"
Occasionally, the failure can be recovered by restarting the IMM. If this is not successful, then it is necessary to reseat the blade in the chassis to recover. After a reseat, the blade will boot normally.
Friday, October 28, 2011
IBM DS4000 (FastT) Storage Manager Client on Windows
Boy, this blog "How to Install IBM DS4000 (FastT) Storage Manager Client on Windows" is really helpful in getting information and the software on IBM DS4000 (FastT) Storage Manager Client. Even easier than finding on IBM Website.
......
1) Download the software.
For Windows XP, 2000, 2003, or 2008, on a 32-bit platform, click here.
For Windows Vista , 2003, 2008, on a 64-bit platform, click here
For Windows Vista 32-bit, click here.
If these links don’t work for you, try navigating IBM’s site:
www.ibm.com > support & downloads > fixes, updates, and drivers
Category > (under SYSTEMS) system storage
Product Family > disk systems, Product > DS4800 or whichever DS4000
Select Operating System and Click GO
Click Downloads on the Support and Downloads box.
.............
For more information do go to How to Install IBM DS4000 (FastT) Storage Manager Client on Windows
......
1) Download the software.
For Windows XP, 2000, 2003, or 2008, on a 32-bit platform, click here.
For Windows Vista , 2003, 2008, on a 64-bit platform, click here
For Windows Vista 32-bit, click here.
If these links don’t work for you, try navigating IBM’s site:
www.ibm.com > support & downloads > fixes, updates, and drivers
Category > (under SYSTEMS) system storage
Product Family > disk systems, Product > DS4800 or whichever DS4000
Select Operating System and Click GO
Click Downloads on the Support and Downloads box.
.............
For more information do go to How to Install IBM DS4000 (FastT) Storage Manager Client on Windows
Monday, October 24, 2011
Looking for solution.... CPU soft lockup detected for CentOS 5 and IBM BladeCentre
One of my IBM BladeCentre node hangs and the log messages generated
"BUG: soft lockup - CPU#1 stuck for 10s! [rpciod/1:3646]"
I have been looking around, but found a reference but not a solution though. I have seen other forum that
RHEL 5.X CPU soft lockup detected in PAGE_LOCK_ANON_VMA - IBM BladeCenter and System x
Symptom
While running the Red Hat Enterprise Linux 5.x (RHEL5) family of products, the kernel may report the following error:
The associated stack backtrace points to page_lock_anon_vma as the code running at the time of the soft lockup detection.
Affected configurations
The system is configured with at least one of the following:
This tip is not option specific.
Note: This does not imply that the network operating system will work under all combinations of hardware and software. Please see the compatibility page for more information: http://www.ibm.com/servers/eserver/serverproven/compat/us/
Solution
This behavior will be corrected in subsequent families of Red Hat products. For more information, contact Red Hat at the following URL:
"BUG: soft lockup - CPU#1 stuck for 10s! [rpciod/1:3646]"
I have been looking around, but found a reference but not a solution though. I have seen other forum that
RHEL 5.X CPU soft lockup detected in PAGE_LOCK_ANON_VMA - IBM BladeCenter and System x
Symptom
While running the Red Hat Enterprise Linux 5.x (RHEL5) family of products, the kernel may report the following error:
| BUG: soft lockup - CPU#XX stuck for 10s! Where XX can be the number of any processor in the system. |
Affected configurations
The system is configured with at least one of the following:
- Red Hat Enterprise Linux 5, any update
This tip is not option specific.
Note: This does not imply that the network operating system will work under all combinations of hardware and software. Please see the compatibility page for more information: http://www.ibm.com/servers/eserver/serverproven/compat/us/
Solution
This behavior will be corrected in subsequent families of Red Hat products. For more information, contact Red Hat at the following URL:
| http://www.redhat.com/about/contact/ |
Thursday, October 6, 2011
A good read - Dissecting shared libraries
This article "Dissecting shared libraries" from IBM DeveloperWorks is a good read if you wish to have a deeper understanding on shared libraries.
Monday, October 3, 2011
Troubleshooting Blade Management Module connectivity issues
This article is a sub-set of the full document from IBM "Troubleshooting Management Module connectivity issues"

Solution
Solution
The Management Module (MM) and the Advanced Management Module (AMM) are the central points of management for the IBM BladeCenter chassis. As such, when the MM is not responsive, the ability to perform normal management on the chassis is significantly compromised. This document covers four different symptoms related to MM connectivity failures: (1) cannot login to the web or telnet interface because of USERID and/or PASSWORD failures. (2) cannot get any network response from the MM, and (3) the MM responds to network pings, but either the web interface or telnet interface does not respond. (4) MM failover does not work.
Throughout this document, "MM" will be used to mean either the MM or AMM. The term AMM will only be used to point out any differences between the two.
When troubleshooting MM connectivity problems, there are a few common procedures that are used in several situations.
Reset the IPaddress of the MM (this procedure does not work on the AMM)
When the MM is restored to its default TCPIP configuration, the Ethernet port on the MM will attempt to get a DHCP address. Disconnect the Ethernet cable if this is not wanted. With the Ethernet cable disconnected, the MM will search for a DHCP server for five minutes, then timeout and take the address 192.168.70.125/255.255.255.0.
Before resetting the MM to its default configuration, have a laptop local to the chassis that can connect to the MM with a cross-over cable (the AMM supports either cable type). Make sure that the laptop is configured with the IPaddress 192.168.70.100/255.255.255.0 so it will not conflict with any address on the chassis. To reset the TCPIP address on the MM, insert a paper-clip into the hole on the back of the MM labeled "IPreset" until it depressed the button inside. Hold it there for just under three seconds, then remove the paper clip. That resets the MM's Ethernet interface to its default configuration.
Reset the IPaddress of the AMM using the serial cable
The AMM has a port for ethernet and serial connectivity. The serial port is at the top of the AMM, just above the video connection. To connect to the serial port, insert one end of a straight-through ethernet cable in the AMM serial port. Attach the other end of the cable to the serial dongle whose pinouts are described in the AMM Installation Guide ("Serial connection," near the end of Chapter 3).
The default serial settings for the AMM are 57k, 8 data bits, No parity, 1 stop bit, flow control off. Once connected to the serial console, login as usual. Create a basic config for the external interface with the following commands (system: x is either system:mm 1 for the AMM in slot 1 or system:mm 2 for the AMM in slot 2).
use static ip: ifconfig -eth0 -c static -T system:mm x
IPaddress: ifconfig -eth0 -i ip-address -T system:mm x
subnet mask ifconfig -eth0 -s subnet mask -T
system:mm x
gateway: ifconfig -eth0 -g IPaddress of gateway -T
system:mm x
They can be combined into one long command as follows:
ifconfig -eth0 -i ip_address -s subnet mask -g IPof gateway -c static -T system:mm x
Reset the MM to its default configuration
One should remember that resetting the MM to defaults turns off the external ports for all four I/O modules, which will cut off all network and fibre connectivity. Therefore, this operation should only be done when the chassis is in a maintenance window and can be off-line for a short period of time. Also, when the MM is restored to its default configuration, it will attempt to get a DHCP address. Disconnect the Ethernet cable if a DHCP address is not wanted. The MM will search for a DHCP server for five minutes, then timeout and take the address 192.168.70.125/255.255.255.0. Before resetting the MM to its default configuration, have a laptop local to the chassis that can connect to the MM with a cross-over cable (the AMM supports either cable type). Make sure that the laptop is configured with the IPaddress 192.168.70.100/255.255.255.0 so it will not conflict with any default address on the chassis.
If the MM is accepting web logins, the default configuration can be restored in the web GUI at:
Select (MM) MM Control, click Restore Defaults, and then click Restore Defaults
Select (AMM) MM Control, click Configuration Mgmt, then click Restore Defaults or click Restore Defaults Preserve Logs
If neither login service is working, the default configuration can be restored by accessing the back of the MM. On the back of the MM, there is a pin hole that is large enough for a paper clip. It is labeled "IPreset." In addition to resetting the IPaddress, pushing a paper clip in for the right amount of time resets the entire MM configuration back to its defaults. To reset the Management Module to the default configuration, including the default login name "USERID" and password "PASSW0RD," push a paper clip into the pin hole until it hits the button inside and hold it. The amount of time required to hold the pin in varies as follows:
MM with 82D firmware or earlier = push in for 5 seconds, then release the pin for 5 seconds, then push it in for another 10 seconds. The timing is quite precise, make sure a watch with a second hand is available. When the reset starts, the fans will ramp up to full speed, which is clearly audible.
AMM or MM with 82F firmware or later = push in the pin and hold it for 10 seconds. When the reset starts, the fans will ramp up to full speed, which is clearly audible.
Remove and reinsert the MM
Troubleshooting the MM sometimes requires physically removing it from the slot and re-inserting it. Before removing it, note whether the green Ethernet LED or amber LED are lit. In normal operations with an Ethernet cabled connected, the Ethernet LED will be on, and the ambler LED will be off. The amber LED will come on briefly when the MM is powered on or reset. It is also a good idea to look at the female connectors when the MM is removed and examine the female connectors to confirm they have not been damaged. When both MMs are removed, the fans ramp up to full speed.
This is clearly audible. When re-inserting the MM, listen to hear if the fans return to the previous noise level. If they do, that indicates that the MM has completed its POST process. If they do not, that indicates that there is some other problem with the chassis that the MM is trying to address. For a visual indication that the MM is working correctly, look at the MM directly.
After the MM is re-inserted and an Ethernet cable connected, confirm the status of the green Ethernet LED and the amber LED. If the amber LED stays on, that indicates a fault in the MM.
Symptom 1: Cannot login due to bad userid or password
If a user makes five unsuccessfull login attempts, the MM will stop accepting logins for a period of time. Two minutes is the default lockout time, though this is configurable in the MM interface at MM Control then click Login Profiles.
If login fails through both the web and telnet interface, resetting the MM to the default login of "USERID" and "PASSWORD" can be accomplished by following the procedure "Reset the MM to its default configuration." The default login ID and password are case sensitive, and in "PASSWORD." a zero is used for the letter "O."
If USERID/PASSWORD login problems still exist after resetting the MM to defaults, contact IBM support. If the MM does not have network connectivity after resetting defaults, follow the steps below for the appropriate symptom.
Symptom 2: MM does not respond to any network connection
If the MM does not respond to any remote network connection, troubleshooting will need to be done at the chassis. The first step is to find a laptop that can login to other MMs and connect it to the MM with a cross-over cable (either a cross-over or straight through can be used for the AMM). Verify that the IPconfiguration on the laptop puts it in the same subnet as the MM, and verify that the laptop is not running a local firewall. Try to connect to the MM via a web browser, telnet, and ping. Depending on the results you get, take the following steps:
If the laptop has complete access to the MM when connected locally, then the previous connectivity problems are most likely due to network problems on the customer's LAN, or the other workstation the customer used to access this MM.
If the laptop can ping the MM, but cannot connect via web browser or telnet, go to symptom
If the laptop cannot ping the MM, take the following steps to try and restore connectivity.
Clear the arp cache on the laptop. - If the chassis has a redundant MM, fail over to it and attempt to connect to it.
If the chassis only has one MM, move it to the other slot, following the procedure "Remove and reinsert the MM."
Follow the procedure "Reset the IPaddress of the MM" or "Reset the IPaddress for the AMM using the serial cable."
Follow the procedure "Reset the MM to its default configuration"
If these all fail, contact IBM support for assistance.
Symptom 3: Cannot connect to the MM using the web browser/telnet/ssh, but can ping the MM
The MM runs a few network servers that enable users to login and manage the chassis. If basic connectivity via 'ping' is functioning, but one or more of the login services is not working (for example, web server, telnet server), the problem is due to a configuration error or firmware defects. It is never a hardware failure. When the MM will respond to a ping, but any one of the login services does not respond, take the the following steps:
Ensure that a supported web browser is being used.
If possible, verify whether the MM is running the network servers on their default network ports. If all logins fail, check with the administrator for the BladeCenter. If it is possible to login to the web interface, select MM Control and click Port Assignments. There is no way to get that information in the telnet interface.
Verify whether this workstation can connect to other MMs. If it cannot, the problem is most likely due to a firewall running on the client workstation or the network. Shutdown any firewalls on the client machine and try again. If the client still has problems connecting to multiple MMs, consult the network administrator for the LAN.
Restart the MM. If the MM responds to network logins after it has been restarted, this is most likely an MM firmware defect. Download the changelog for the current MM or AMM code and see if any similar issues have been resolved. If not, contact IBM Support for additional assistance.
At this point. troubleshooting must continue with a laptop or other workstation local to the MM. Find a laptop which can connect to other MMs, and connect it directly to the MM with a crossover cable (both cross-over and straight-though work for the AMM). Verify that the Ethernet link is up and the laptop is configured so it is on the same subnet as the MM. If the laptop can ping the MM, attempt to login to the MM with a supported web browser. If that works, contact the network administrator for assistance troubleshooting the network.
If the MM still does not allow logins over the WEB interface at this point, restore the MM to its defaults with the procedure "Reset the MM to its default configuration." If this does not restore connectivity, contact IBM Support.
Symptom 4: Failover of MM to redundant MM does not work
When there are two MMs in a chassis, one MM is active and the second MM is on standby. When a user initiates a failover from the primary to redundant, the primary sends a message to redundant to become the primary, then reboots itself. On rare occasions, this does not work. When it does not, take the follow steps to resolve it:
Examine the MM Event log and the MM BIST log to see if any errors have been detected.
Physically remove the primary MM and see if the redundant MM boots successfully. If it does not, move it to the other slot and see if it can boot in that slot
Reset the MM to defaults using the procedure "Reset the MM to its default configuration."
Repeat the failover process with both MMs. If it still does not work, contact IBM support
When troubleshooting MM connectivity problems, there are a few common procedures that are used in several situations.
Reset the IPaddress of the MM (this procedure does not work on the AMM)
When the MM is restored to its default TCPIP configuration, the Ethernet port on the MM will attempt to get a DHCP address. Disconnect the Ethernet cable if this is not wanted. With the Ethernet cable disconnected, the MM will search for a DHCP server for five minutes, then timeout and take the address 192.168.70.125/255.255.255.0.
Before resetting the MM to its default configuration, have a laptop local to the chassis that can connect to the MM with a cross-over cable (the AMM supports either cable type). Make sure that the laptop is configured with the IPaddress 192.168.70.100/255.255.255.0 so it will not conflict with any address on the chassis. To reset the TCPIP address on the MM, insert a paper-clip into the hole on the back of the MM labeled "IPreset" until it depressed the button inside. Hold it there for just under three seconds, then remove the paper clip. That resets the MM's Ethernet interface to its default configuration.
Reset the IPaddress of the AMM using the serial cable
The AMM has a port for ethernet and serial connectivity. The serial port is at the top of the AMM, just above the video connection. To connect to the serial port, insert one end of a straight-through ethernet cable in the AMM serial port. Attach the other end of the cable to the serial dongle whose pinouts are described in the AMM Installation Guide ("Serial connection," near the end of Chapter 3).
The default serial settings for the AMM are 57k, 8 data bits, No parity, 1 stop bit, flow control off. Once connected to the serial console, login as usual. Create a basic config for the external interface with the following commands (system: x is either system:mm 1 for the AMM in slot 1 or system:mm 2 for the AMM in slot 2).
use static ip: ifconfig -eth0 -c static -T system:mm x
IPaddress: ifconfig -eth0 -i ip-address -T system:mm x
subnet mask ifconfig -eth0 -s subnet mask -T
system:mm x
gateway: ifconfig -eth0 -g IPaddress of gateway -T
system:mm x
They can be combined into one long command as follows:
ifconfig -eth0 -i ip_address -s subnet mask -g IPof gateway -c static -T system:mm x
Reset the MM to its default configuration
One should remember that resetting the MM to defaults turns off the external ports for all four I/O modules, which will cut off all network and fibre connectivity. Therefore, this operation should only be done when the chassis is in a maintenance window and can be off-line for a short period of time. Also, when the MM is restored to its default configuration, it will attempt to get a DHCP address. Disconnect the Ethernet cable if a DHCP address is not wanted. The MM will search for a DHCP server for five minutes, then timeout and take the address 192.168.70.125/255.255.255.0. Before resetting the MM to its default configuration, have a laptop local to the chassis that can connect to the MM with a cross-over cable (the AMM supports either cable type). Make sure that the laptop is configured with the IPaddress 192.168.70.100/255.255.255.0 so it will not conflict with any default address on the chassis.
If the MM is accepting web logins, the default configuration can be restored in the web GUI at:
Select (MM) MM Control, click Restore Defaults, and then click Restore Defaults
Select (AMM) MM Control, click Configuration Mgmt, then click Restore Defaults or click Restore Defaults Preserve Logs
If neither login service is working, the default configuration can be restored by accessing the back of the MM. On the back of the MM, there is a pin hole that is large enough for a paper clip. It is labeled "IPreset." In addition to resetting the IPaddress, pushing a paper clip in for the right amount of time resets the entire MM configuration back to its defaults. To reset the Management Module to the default configuration, including the default login name "USERID" and password "PASSW0RD," push a paper clip into the pin hole until it hits the button inside and hold it. The amount of time required to hold the pin in varies as follows:
MM with 82D firmware or earlier = push in for 5 seconds, then release the pin for 5 seconds, then push it in for another 10 seconds. The timing is quite precise, make sure a watch with a second hand is available. When the reset starts, the fans will ramp up to full speed, which is clearly audible.
AMM or MM with 82F firmware or later = push in the pin and hold it for 10 seconds. When the reset starts, the fans will ramp up to full speed, which is clearly audible.
Remove and reinsert the MM
Troubleshooting the MM sometimes requires physically removing it from the slot and re-inserting it. Before removing it, note whether the green Ethernet LED or amber LED are lit. In normal operations with an Ethernet cabled connected, the Ethernet LED will be on, and the ambler LED will be off. The amber LED will come on briefly when the MM is powered on or reset. It is also a good idea to look at the female connectors when the MM is removed and examine the female connectors to confirm they have not been damaged. When both MMs are removed, the fans ramp up to full speed.
This is clearly audible. When re-inserting the MM, listen to hear if the fans return to the previous noise level. If they do, that indicates that the MM has completed its POST process. If they do not, that indicates that there is some other problem with the chassis that the MM is trying to address. For a visual indication that the MM is working correctly, look at the MM directly.
After the MM is re-inserted and an Ethernet cable connected, confirm the status of the green Ethernet LED and the amber LED. If the amber LED stays on, that indicates a fault in the MM.
Symptom 1: Cannot login due to bad userid or password
If a user makes five unsuccessfull login attempts, the MM will stop accepting logins for a period of time. Two minutes is the default lockout time, though this is configurable in the MM interface at MM Control then click Login Profiles.
If login fails through both the web and telnet interface, resetting the MM to the default login of "USERID" and "PASSWORD" can be accomplished by following the procedure "Reset the MM to its default configuration." The default login ID and password are case sensitive, and in "PASSWORD." a zero is used for the letter "O."
If USERID/PASSWORD login problems still exist after resetting the MM to defaults, contact IBM support. If the MM does not have network connectivity after resetting defaults, follow the steps below for the appropriate symptom.
Symptom 2: MM does not respond to any network connection
If the MM does not respond to any remote network connection, troubleshooting will need to be done at the chassis. The first step is to find a laptop that can login to other MMs and connect it to the MM with a cross-over cable (either a cross-over or straight through can be used for the AMM). Verify that the IPconfiguration on the laptop puts it in the same subnet as the MM, and verify that the laptop is not running a local firewall. Try to connect to the MM via a web browser, telnet, and ping. Depending on the results you get, take the following steps:
If the laptop has complete access to the MM when connected locally, then the previous connectivity problems are most likely due to network problems on the customer's LAN, or the other workstation the customer used to access this MM.
If the laptop can ping the MM, but cannot connect via web browser or telnet, go to symptom
If the laptop cannot ping the MM, take the following steps to try and restore connectivity.
Clear the arp cache on the laptop. - If the chassis has a redundant MM, fail over to it and attempt to connect to it.
If the chassis only has one MM, move it to the other slot, following the procedure "Remove and reinsert the MM."
Follow the procedure "Reset the IPaddress of the MM" or "Reset the IPaddress for the AMM using the serial cable."
Follow the procedure "Reset the MM to its default configuration"
If these all fail, contact IBM support for assistance.
Symptom 3: Cannot connect to the MM using the web browser/telnet/ssh, but can ping the MM
The MM runs a few network servers that enable users to login and manage the chassis. If basic connectivity via 'ping' is functioning, but one or more of the login services is not working (for example, web server, telnet server), the problem is due to a configuration error or firmware defects. It is never a hardware failure. When the MM will respond to a ping, but any one of the login services does not respond, take the the following steps:
Ensure that a supported web browser is being used.
If possible, verify whether the MM is running the network servers on their default network ports. If all logins fail, check with the administrator for the BladeCenter. If it is possible to login to the web interface, select MM Control and click Port Assignments. There is no way to get that information in the telnet interface.
Verify whether this workstation can connect to other MMs. If it cannot, the problem is most likely due to a firewall running on the client workstation or the network. Shutdown any firewalls on the client machine and try again. If the client still has problems connecting to multiple MMs, consult the network administrator for the LAN.
Restart the MM. If the MM responds to network logins after it has been restarted, this is most likely an MM firmware defect. Download the changelog for the current MM or AMM code and see if any similar issues have been resolved. If not, contact IBM Support for additional assistance.
At this point. troubleshooting must continue with a laptop or other workstation local to the MM. Find a laptop which can connect to other MMs, and connect it directly to the MM with a crossover cable (both cross-over and straight-though work for the AMM). Verify that the Ethernet link is up and the laptop is configured so it is on the same subnet as the MM. If the laptop can ping the MM, attempt to login to the MM with a supported web browser. If that works, contact the network administrator for assistance troubleshooting the network.
If the MM still does not allow logins over the WEB interface at this point, restore the MM to its defaults with the procedure "Reset the MM to its default configuration." If this does not restore connectivity, contact IBM Support.
Symptom 4: Failover of MM to redundant MM does not work
When there are two MMs in a chassis, one MM is active and the second MM is on standby. When a user initiates a failover from the primary to redundant, the primary sends a message to redundant to become the primary, then reboots itself. On rare occasions, this does not work. When it does not, take the follow steps to resolve it:
Examine the MM Event log and the MM BIST log to see if any errors have been detected.
Physically remove the primary MM and see if the redundant MM boots successfully. If it does not, move it to the other slot and see if it can boot in that slot
Reset the MM to defaults using the procedure "Reset the MM to its default configuration."
Repeat the failover process with both MMs. If it still does not work, contact IBM support
Tuesday, June 7, 2011
Singapore university and IBM cooperate on cloud
Interesting Article on a Singapore University and IBM collaboration on Cloud.
HPC Cloud to be exact
See Singapore university and IBM cooperate on cloud (Future Gov Asia Pacific)
HPC Cloud to be exact
See Singapore university and IBM cooperate on cloud (Future Gov Asia Pacific)
Thursday, April 7, 2011
Blade hangs on boot and "FW/BIOS, firmware progress (ABR Status) FW/BIOS ROM corruption" message in AMM
If you see and encounter error
Blade hangs on boot and "FW/BIOS, firmware progress (ABR Status) FW/BIOS ROM corruption" message in AMM - IBM BladeCenter HS22, HS22V
Symptoms
When booting BladeCenter HS22 or HS22V with Integrated Management Module (IMM) build yuoo84c installed, the blade may hang at the "UEFI Platform Initializing" screen. The hang will be accompanied by the following event in the chassis Advanced Management Module (AMM) log:
Affected Systems:
The system may be any of the following IBM servers:
This failure may be reduced by disabling Internet Protocol Version 6 (IPv6) support for the IMM. This can be done via the following steps:
Additional Information
This error only occurs at boot time so production servers that are up and running are not at risk.
For more information, see Blade hangs on boot and "FW/BIOS, firmware progress (ABR Status) FW/BIOS ROM corruption" message in AMM - IBM BladeCenter HS22, HS22V
Blade hangs on boot and "FW/BIOS, firmware progress (ABR Status) FW/BIOS ROM corruption" message in AMM - IBM BladeCenter HS22, HS22V
Symptoms
When booting BladeCenter HS22 or HS22V with Integrated Management Module (IMM) build yuoo84c installed, the blade may hang at the "UEFI Platform Initializing" screen. The hang will be accompanied by the following event in the chassis Advanced Management Module (AMM) log:
FW/BIOS, firmware progress (ABR Status) FW/BIOS ROM corruption
Affected Systems:
The system may be any of the following IBM servers:
- BladeCenter HS22, type 1936, any model
- BladeCenter HS22, type 7870, any model
- BladeCenter HS22V, type 1949, any model
- BladeCenter HS22V, type 7871, any model
This failure may be reduced by disabling Internet Protocol Version 6 (IPv6) support for the IMM. This can be done via the following steps:
- Boot the blade to the F1 Unified Extensible Firmware Interface (UEFI) setup screen.
- Select "System Settings" and press Enter
- Select "Integrated Management Module" and press Enter
- Select "Network Configuration" and press Enter
- Change "IP6" setting to "Disable"
Additional Information
This error only occurs at boot time so production servers that are up and running are not at risk.
For more information, see Blade hangs on boot and "FW/BIOS, firmware progress (ABR Status) FW/BIOS ROM corruption" message in AMM - IBM BladeCenter HS22, HS22V
Subscribe to:
Posts (Atom)


